How to Take a Passport Photo With an iPhone at Home
Many authorities accept a self-taken passport photo. Set up an iPhone at eye level, use even light, then crop to the correct country size.
You can take the source for a passport photo with an iPhone if the issuing authority accepts self-taken photos. The phone model is not the hard part. You need a sharp, evenly lit, front-facing image with enough space to crop to the required size.
This guide uses a US passport photo as the working example. Check your country's rules before you submit.
Can you take your own passport photo?
For a US application, a photo you take at home can be used if it meets the same Department of State rules as a studio photo: size, pose, background, lighting and an unaltered face. An iPhone can capture that source. It cannot skip the crop, the background or the final visual check.
If you are applying in the UK, GOV.UK still requires the same pose and quality rules, including a closed-mouth expression. See can you smile in a passport photo.
What you need
- An iPhone with a clean camera lens
- A second person or a stable phone support
- Soft daylight or even front lighting
- A plain wall without a hard head-shaped shadow
- Enough distance to include the full head and shoulders
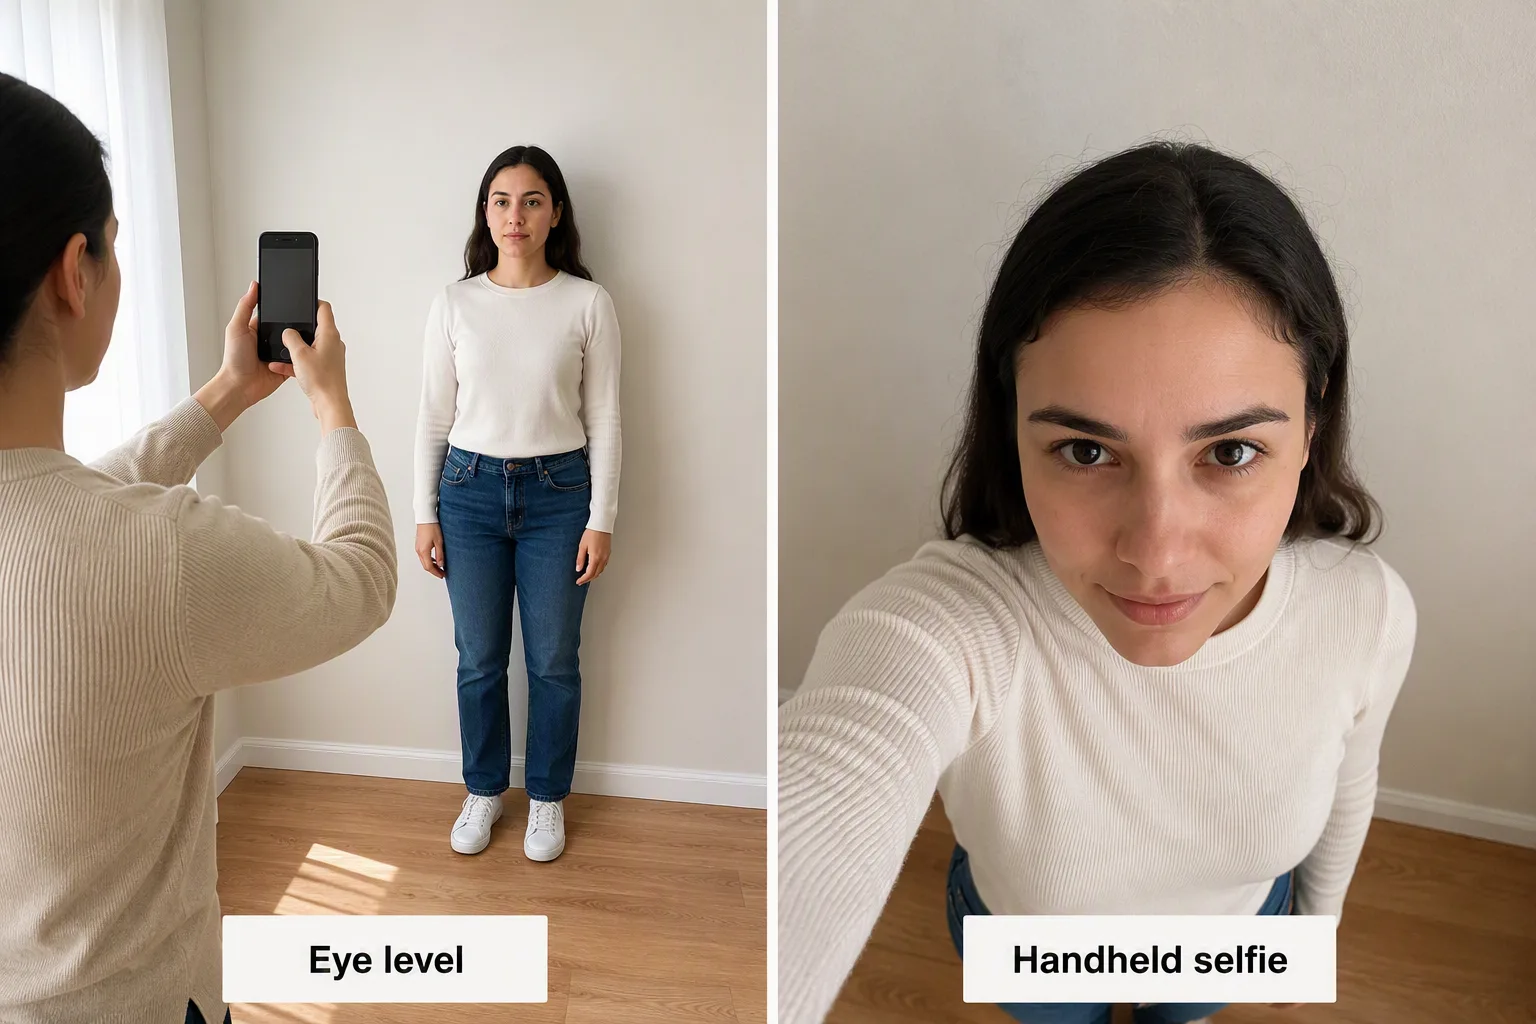
Use the rear camera when another person can take the photo. It is easier to hold level than a handheld selfie.
1. Clean the lens and check camera settings
Wipe the lens with a clean microfiber cloth. A fingerprint can soften the whole image even when the phone reports that it is focused.
Use standard Photo mode. Turn off Portrait mode so artificial blur does not eat the hair or shoulder edges. Avoid filters, photographic styles that shift skin color and beauty-editing apps.
2. Set up soft, even light
Face a large window in indirect daylight, or place two similar lights in front of you at roughly equal angles. Avoid standing under a ceiling light, which carves dark eye sockets.
Check that one side of the face is not much brighter than the other. The wall behind you should be even, without a silhouette shadow. Background replacement later will not fix a shadowed face.
3. Put the iPhone at eye level
Hold the lens level with the subject's eyes. A phone that is too high makes the person look upward; a low phone emphasizes the chin.
Keep the phone upright and parallel to the face. The Camera grid can help you keep the frame level. Do not hold the phone at arm's length: selfie distance distorts the nose and jaw.
4. Leave room around the head and shoulders
Do not fill the frame with the face. Include the full head, hair and both shoulders, with clear space above and beside the subject. Fogkits needs this extra area to center the face and build the country crop.
For a US passport, the finished image is square at 2 × 2 inches (51 × 51 mm). The source photo itself does not need to be square.
5. Use a neutral, front-facing pose
Look at the lens, keep both eyes open and hold your head upright. For a US photo, a neutral expression or natural smile is allowed; a closed-mouth frame is still the least ambiguous. Remove glasses unless you have the limited US medical exception; details are in glasses in a passport photo.
Wear a solid mid-tone top. A white shirt on a white wall is a common rejection; see what to wear.
6. Take several photos without digital zoom
Have the photographer move closer or farther away instead of pinching to zoom. Digital zoom drops detail. Take several frames so you can pick one with sharp eyes and no motion blur.
If you are working alone, use a stable support and the timer. Parents photographing an infant should use the overhead method in the baby passport photo guide.
7. Choose the original, sharpest file
Open each candidate at full size and inspect the eyes, hairline and jaw. Reject motion blur, closed eyes, strong shadows or clipped hair.
Upload the original file from Photos. A screenshot or a copy sent through a messaging app is often compressed. That compression is a frequent entry in rejected passport photos.
8. Crop to the country preset
Open the Fogkits passport photo maker, choose the country and upload the source. Fogkits checks the face and pose, removes the original background and crops to the selected preset.
You can inspect a watermarked preview for free. The final high-resolution download uses 1 credit. Fogkits does not guarantee acceptance, so compare the preview with the latest issuing-authority page.
Common iPhone mistakes
Using Portrait mode
Artificial blur can remove fine hair or leave a halo. Use standard Photo mode and let background removal work from a naturally sharp source.
Taking a handheld selfie
A close selfie distorts the nose and jaw, tilts the camera and crops the shoulders. Ask another person, or use a timer with the phone supported at eye level.
Standing too close to the wall
This puts a hard shadow behind the head. Step forward while keeping enough distance from the camera for a natural perspective.
Editing the face
Do not reshape features, smooth skin heavily, replace eyes or paint out glare. Retake the source when something obscures the face.
Final checklist
- Lens is clean and standard Photo mode is on.
- Camera is at eye level and parallel to the face.
- Both sides of the face are evenly lit.
- Full head, hair and shoulders are visible.
- Eyes are open; expression matches the destination country.
- No glasses for a US photo, except a documented medical exception.
- Original file is sharp and unfiltered.
- Final crop is checked against the correct country rules.
For dimensions and rejection checks, use the passport photo requirements guide.
Official sources
Last checked 10 September 2026.